


TL;DR:
- Consistent hemp edibles rely on precise decarboxylation, infusion, and thorough mixing rather than luck.
- Proper preparation, quality ingredients, accurate dosing, and detailed notes ensure reliable, enjoyable results every time.
You’ve tried making hemp edibles at home, and the results felt like a coin flip. Sometimes too strong, sometimes barely noticeable, and occasionally just a bad-tasting batch that got tossed. The frustration is real, and it’s one of the most common experiences for DIY edible makers. Getting consistent, enjoyable results from homemade hemp edibles comes down to a process, not luck. This guide walks you through every stage, from ingredient prep to final dosing, so you can craft edibles that actually deliver the recreational buzz or calm wellness moment you’re looking for, every single time.
Table of Contents
- What you need before starting
- Step-by-step edibles process
- Dosing and potency: Getting it right
- Troubleshooting and common mistakes
- What to expect: Edibles effects and timing
- Our take: Why most DIY hemp edibles go wrong — and how to do it right
- Elevate your hemp edibles journey with trusted resources
- Frequently asked questions
Key Takeaways
| Point | Details |
|---|---|
| Preparation is key | Gathering the right tools and understanding the process prevents mistakes and wasted ingredients. |
| Dosing accuracy matters | Measuring and dividing your infusions carefully ensures safe and enjoyable effects every time. |
| Watch for common errors | Problems with decarboxylation, infusion, or storage can seriously impact your results, but they’re easy to fix with the right approach. |
| Effects are delayed | Expect hemp edible effects to set in more slowly than smoking or vaping, so start small and be patient. |
| Try, test, and refine | Start with small batches and tweak your process to discover what works best for your body and taste. |
What you need before starting
To begin, it’s vital to gather everything you need and set yourself up for success. Running out of cheesecloth halfway through an infusion or realizing your thermometer is missing mid-decarb can derail an entire batch. Good preparation makes everything smoother.
Essential kitchen equipment:
- Baking sheet with parchment paper (for decarboxylation)
- Oven thermometer (your oven’s built-in display is often inaccurate)
- Double boiler or slow cooker
- Cheesecloth or fine mesh strainer
- Glass jars with lids (airtight storage)
- Kitchen scale (grams matter here)
- Silicone molds for gummies or chocolates
Core ingredients:
- Hemp flower or a pre-made hemp extract (distillate or tincture)
- Carrier oil (coconut oil, MCT oil, or unsalted butter)
- Sunflower or soy lecithin (acts as an emulsifier for better absorption)
- Any base recipe ingredient: gummy mix, brownie batter, or a savory fat base
Exploring different hemp infusion methods before you start can help you pick the right approach for your goals and skill level. Some methods work better for oil-based recipes, while others suit butter-forward bakes.
Safety matters from the start. Work in a clean, ventilated space. Safe preparation and dosing is especially important when you’re creating products for personal or shared use. Label everything clearly with the intended dose per serving, date made, and type of hemp used.
| Item | Purpose | Alternative option |
|---|---|---|
| Oven thermometer | Accurate decarb temp | Candy thermometer (clip-in) |
| Double boiler | Gentle, controlled heat | Slow cooker on low setting |
| Cheesecloth | Strain plant material | Fine mesh strainer |
| Kitchen scale | Precise measurements | Measuring spoons (less accurate) |
| Silicone molds | Uniform edible portions | Ice cube trays |
| Lecithin | Emulsification and absorption | Sunflower lecithin granules |
Pro Tip: Keep a dedicated notebook or notes app entry for every batch you make. Write down the strain or extract used, temperatures, infusion time, and final dosing notes. You’ll thank yourself after your second or third batch when you’re trying to replicate a winner.
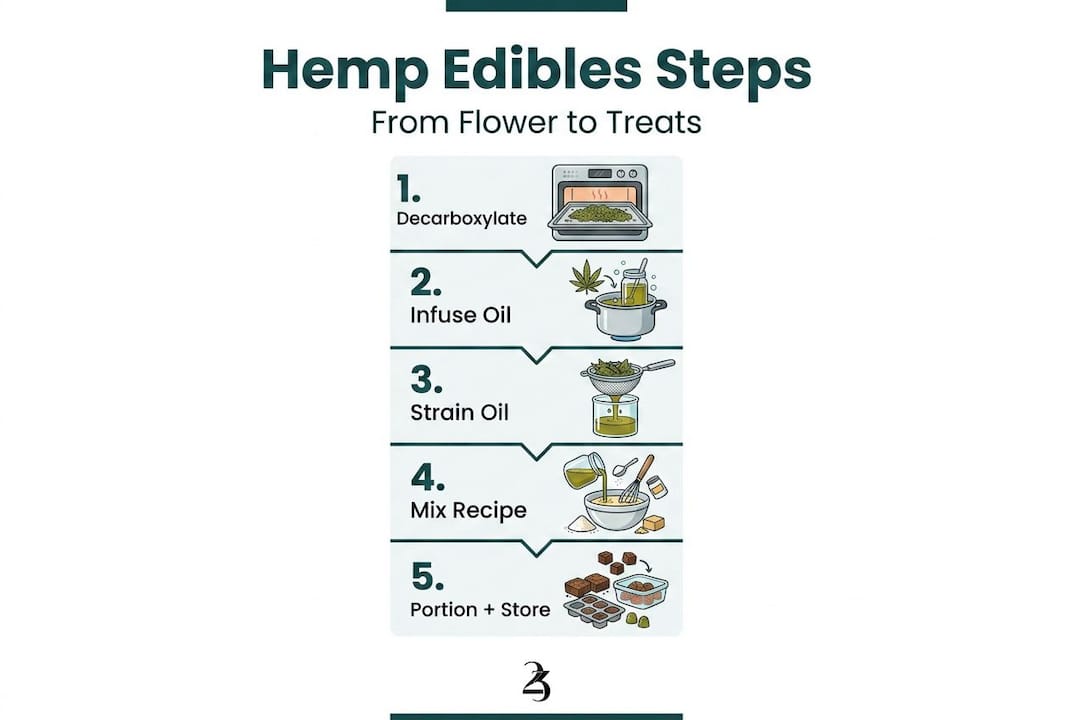
Step-by-step edibles process
With your tools and ingredients ready, let’s start with the step-by-step process.
-
Decarboxylate your hemp flower. This is the activation step most beginners skip or rush. Preheat your oven to 240°F (using your oven thermometer, not the dial). Spread ground hemp flower in an even layer on a parchment-lined baking sheet. Bake for 40 to 45 minutes, gently stirring once halfway through. The flower should look lightly toasted and smell earthy and warm. Exploring different decarboxylation methods can show you why skipping this step leads to weak or unreliable results.
-
Infuse hemp into your carrier oil or butter. Add your decarboxylated hemp and carrier oil to a double boiler. Maintain a temperature between 160°F and 200°F for 2 to 4 hours. Don’t let it boil or exceed 200°F, as this breaks down the beneficial compounds. Add a teaspoon of lecithin per cup of oil to improve how your body absorbs the final product. Proper infusion techniques for edibles emphasize the importance of low-and-slow heating for maximum potency retention.
-
Strain the infused oil. Line your strainer or funnel with cheesecloth and pour the infusion through it into a clean glass jar. Let gravity do the work. Resist the urge to squeeze the cheesecloth aggressively since that can push unwanted plant material and bitter compounds into your finished oil.
-
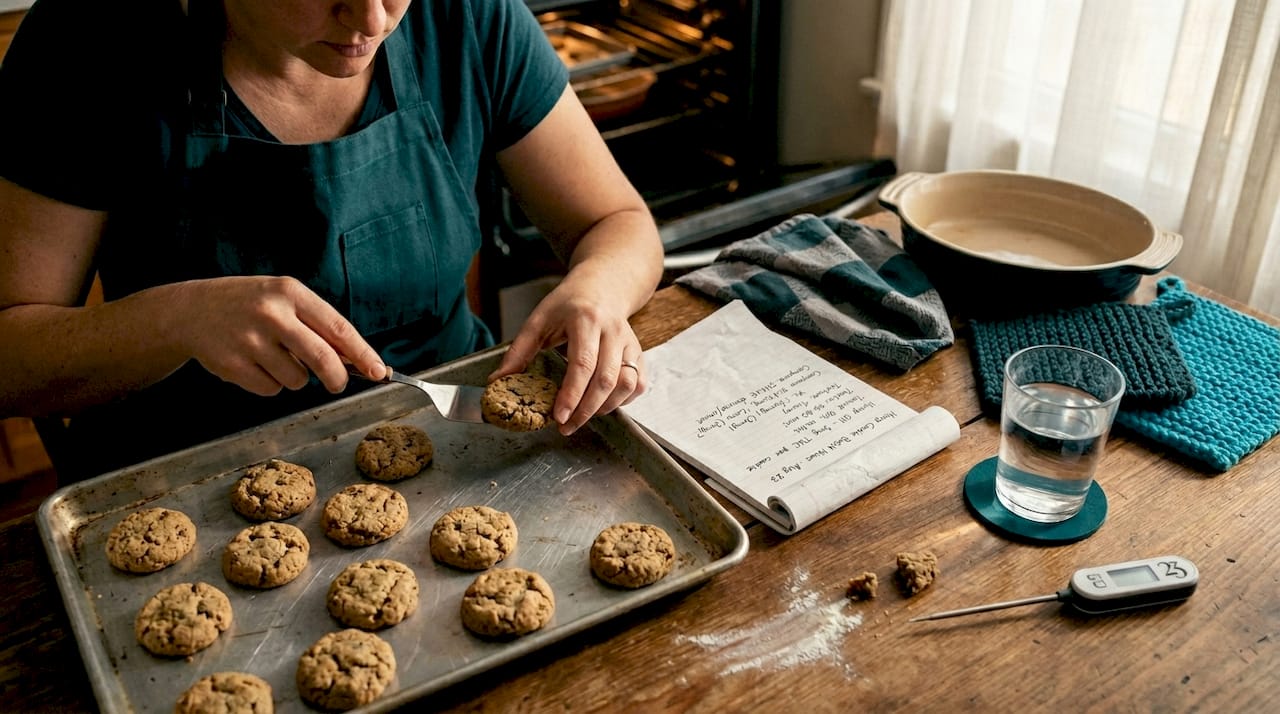
Mix your infused oil into the recipe. Whether you’re making gummies, brownies, or a savory dish, substitute your infused oil where regular oil or butter would go. Use a kitchen scale to ensure every serving gets the same amount of infused fat. This is the step most closely tied to dosing consistency.
-
Portion and set. Use molds or a baking pan to shape your edibles. Once cooled, cut or pop them into uniform pieces. Weigh each piece for accuracy when potency matters.
“Accurate dosing of edibles comes down to how evenly the infused oil is mixed into the final recipe. Stirring thoroughly and portioning by weight is the most reliable path to a consistent edible dose every time.”
Pro Tip: If you’re working with a distillate or pre-made extract instead of flower, skip straight to step four. Pre-activated extracts don’t need decarboxylation, which saves time and removes one major variable from the process.
Dosing and potency: Getting it right
Now that you know how to make and infuse edibles, it’s essential to get the dosing right. This is where home edible makers can either shine or seriously overshoot.
How to calculate potency per serving:
Start with the total milligrams of THC or CBD in your hemp flower or extract. For example, if you use 3.5 grams of hemp flower testing at 15% THC, that’s 525 mg of THC in the entire batch before any processing loss. Realistically, infusion efficiency runs around 60 to 80%, so expect closer to 315 to 420 mg per batch. If your recipe makes 30 gummies, each gummy contains roughly 10 to 14 mg.
The milligrams per serving question is one most home chefs underestimate. Beginners often feel comfortable around 2.5 to 5 mg, while experienced users may prefer 10 to 25 mg. Start intentionally low with a new batch and adjust next time based on your experience.
Common mistakes to avoid:
- Skipping the lecithin, which reduces absorption and makes effects unpredictable
- Not mixing the oil thoroughly into the batter before portioning
- Eyeballing amounts instead of weighing
- Eating a second serving before the first one kicks in
- Using inconsistent flower or extract across batches
Traditional vs. nanoemulsified edibles:
Traditional oil-based edibles take longer to kick in because fat must be digested first. Nanoemulsion technology breaks cannabinoids into tiny water-soluble particles, which absorb much faster and more predictably. If you’ve tried water-soluble hemp products before and noticed a faster onset, that’s why.
| Edible type | Typical onset time | Duration | Dosing accuracy |
|---|---|---|---|
| Oil-based brownie or cookie | 45 to 90 minutes | 4 to 8 hours | Moderate |
| Gummies (infused oil) | 45 to 75 minutes | 4 to 6 hours | High |
| Nanoemulsified gummies | 15 to 30 minutes | 3 to 5 hours | Very high |
| Tincture-based edibles | 20 to 45 minutes | 3 to 6 hours | High |
Using gummy dosing tips is especially helpful if gummies are your go-to format since they allow for very precise portioning when done right.
A key stat to keep in mind: Edible effects can vary widely based on whether you’ve eaten recently, your body weight, and your metabolism. The same 10 mg dose can feel very mild to one person and quite strong to another. Always start low and be patient.
Troubleshooting and common mistakes
Even with a good process, issues can arise. Let’s troubleshoot the most common problems.
Flavor issues:
A very grassy or harsh taste usually means too much plant material made it through straining, or the decarb temperature ran too high. Always double-check your oven temp and use a second pass through cheesecloth if needed. Masking flavors like chocolate, citrus, or strong spices work well in final recipes.
Weak or inconsistent effects:
This almost always comes back to decarboxylation or infusion temperature. If the oven runs too cool, the hemp never fully activates. If the infusion runs too hot, the compounds start to degrade. Staying within that 160 to 200°F infusion window is non-negotiable. The cannabis consumption workflow covers why each step matters and what goes wrong when one is rushed.
Troubleshooting checklist:
- Effects too weak: Check decarb temp, infusion time, and lecithin use
- Batch smells burnt: Oven temp likely ran above 250°F during decarb
- Gummies too soft: Didn’t use enough gelatin or set at too warm a temperature
- Uneven effects across pieces: Oil wasn’t mixed thoroughly before portioning
- Oily texture in mouth: Too much fat in the recipe relative to other ingredients
- Edibles went bad quickly: Likely not stored in an airtight container in a cool space
Storage matters more than you’d think. Light, heat, and oxygen are enemies of potency. Store finished edibles in a labeled, airtight container in the fridge or freezer. Most hemp-infused edibles hold their potency for 3 to 6 months when frozen properly.
“Most batch failures happen at two specific points: during decarboxylation and during the final mix. If you nail those steps and store correctly, you set yourself up for boosted edible effects across the whole batch.”
Pro Tip: Before committing your entire batch to a recipe, test a small 10 ml sample of your infused oil in a simple fat-based food like a spoonful of peanut butter. This lets you gauge approximate potency before scaling up to 30 gummies or a full pan of brownies.
What to expect: Edibles effects and timing
Once your edibles are made and stored, here’s what you can expect from the experience.
Key timing points to know:
- Most oil-based edibles take 45 to 90 minutes to kick in on a full stomach
- Effects on an empty stomach can arrive in as little as 30 minutes
- Peak effects typically occur between 2 and 3 hours after eating
- Duration can range from 4 to 8 hours depending on dose and tolerance
- The come-down is gradual, not abrupt, compared to inhaled cannabis
How edibles differ from smoking or vaping:
The effects of inhaled cannabis arrive within minutes and fade within 1 to 2 hours. Edibles create a longer, deeper experience because cannabinoids pass through the digestive system and get processed by the liver. The liver converts THC into a more potent form called 11-hydroxy-THC, which crosses the blood-brain barrier more easily. This is why edibles feel more body-centered and long-lasting.
The entourage effect in edibles is also worth understanding. When you use whole hemp flower rather than isolate, the natural terpenes and cannabinoids work together to shape the experience. You might notice more nuanced, layered effects compared to a simple THC-only product.
Onset and duration by edible type:
| Edible format | Onset time | Peak window | Typical duration |
|---|---|---|---|
| Baked goods (oil-based) | 45 to 90 minutes | 2 to 3 hours | 5 to 8 hours |
| Gummies | 45 to 75 minutes | 1.5 to 3 hours | 4 to 6 hours |
| Chocolates | 30 to 60 minutes | 1.5 to 2.5 hours | 4 to 6 hours |
| Nanoemulsified formats | 15 to 30 minutes | 1 to 2 hours | 3 to 5 hours |
Understanding how infused beverages work is a great reference point too since the absorption principles are similar and help explain why different edible formats hit differently.
If the effects feel too strong: Stay calm, find a comfortable space, drink water, and remember that the intensity will pass. Eating a snack, particularly something with black pepper or CBD, can help take the edge off. Never take more hoping to feel better faster.
Our take: Why most DIY hemp edibles go wrong — and how to do it right
We’ve seen thousands of people try their hand at homemade edibles, and the patterns are strikingly consistent. The problem isn’t effort or creativity. It’s that the conventional how-to advice floating around tends to oversimplify two critical steps: decarboxylation and dosing math.
Most guides tell you to “bake it at 240°F for 40 minutes” and call it done. But they skip the part where your oven might actually run 20 degrees hotter than the dial says, which kills your potency before the infusion even starts. A five-dollar oven thermometer is genuinely transformative for this reason.
The other underrated factor is ingredient quality. Cheap hemp flower with inconsistent cannabinoid percentages makes accurate dosing nearly impossible. When you start with a quality, tested product, your math actually works out. The wellness edibles guide speaks directly to this, emphasizing that sourcing good material is just as important as technique.
Our honest take: the home chefs who get consistently great results are the ones keeping detailed batch notes. They know which strain worked best, which infusion time gave stronger effects, and which recipe format distributed the oil most evenly. It sounds like extra work upfront, but it turns guessing into a repeatable craft. Small batch experimentation is your friend here. Don’t start with a triple batch on your first try. Run a single test batch, taste it, wait for effects, and evaluate before scaling up. That patience is what separates frustrating edible experiments from genuinely satisfying batches you want to make again.
Elevate your hemp edibles journey with trusted resources
Ready to put your new skills to use? Here’s where to continue your hemp edibles journey.
Making your own hemp edibles is one of the most rewarding ways to personalize your wellness and recreational routine. You control the ingredients, the dose, and the entire experience from start to finish. But the process works best when you have solid resources and quality products backing you up.
At 23rd State, we’ve built a full library of guides, dosing resources, and premium hemp products to support every stage of your edible-making adventure. Whether you’re just starting out or refining a batch you’ve made a dozen times, explore more edible resources to find the tools, education, and products that match your vibe. From carefully sourced hemp to step-by-step learning content, we’ve got you covered with everything you need to make edibles you’ll actually love.
Frequently asked questions
How long does it take to feel the effects of homemade hemp edibles?
Homemade hemp edibles typically take between 30 minutes and 2 hours for effects to onset, depending on your metabolism, body weight, and how much you’ve eaten. The entourage effect can also influence how quickly whole-plant edibles take hold compared to isolate-based ones.
How can I determine how potent my edibles will be?
Potency depends on the total milligrams in your starting material, infusion efficiency, and how evenly you divide the batch into servings. Use the edible dosing guide to help calculate realistic milligrams per piece based on your recipe yield.
What if my edibles don’t seem to work?
Check whether you properly decarboxylated your hemp and maintained the right infusion temperature, then make sure you waited a full 2 hours before concluding nothing is happening. The consumption workflow guide walks through each step to help pinpoint where things may have gone off track.
What’s the difference between traditional and nanoemulsified edibles?
Nanoemulsified edibles are broken down into tiny water-soluble particles that absorb much faster through the gut lining, leading to quicker and often more predictable effects than traditional oil-based formats. Nanoemulsion absorption explains exactly why this technology produces a different experience even at the same dose.